Verfassungsbooks Editor Documentation
This book contains the documentation for installation, setup and usage of the Verfassungsbooks Editor.
- User Documentation
- Project Summary
- Getting Started: Project Creation and Metadata
- A. Import
- B. Editing & Organisation
- C. Citation Management
- D. Export
- Template Documentation
- Admin Documentation
- Developer Documentation
- Useful CSS Rules
User Documentation
This part of the documentation explains how to use the editor, create users and import/export.
Project Summary
This Software aims to provide an easy to learn, yet extensive tool set to create books, journals and other publications in fixed (but customizable) layouts.
Comparison
| Feature | Overleaf / Latex | Libreoffice Writer / Microsoft Word | PublishGoods |
| Programmatically created templates | ✅ | ❌ | ✅ |
| Template Language | Latex | - | HTML/CSS/Handlebars |
| Engine used for PDF-Rendering | Latex | HTML renderers (Weasyprint / Vivliostyle) | |
| Import | ❌ (only Latex projects) | ❌ | ✅ WordPress, HTML, Documents (Word/Libreoffice), etc. |
| Export | ⚠ Only PDF | ✅ Many Formats, more with convert tools | ✅ PDF, EPUB, custom formats |
| Content Editor | Latex Code or RichText | Direct | WYSIWYG, based on EditorJS |
| Collaborative Editing | ✅ | ❌ | ⚠ Planned |
| Open Source | ⚠ only the "Community Edition" with less features | Libreoffice: ✅ Microsoft Word: ❌ | ✅ |
| Platforms | Web | Libreoffice: Mac/Linux/Windows Microsoft Word: Windows / Mac |
Web |
Getting Started: Project Creation and Metadata
If you want to use Publish Goods to create a book, a journal issue, or any other text document, you will first have to create a new project and fill in its basic information.
1. Project Creation
 You can do so by clicking on the "Plus" symbol next to "Projects"
Next, give your project a name.
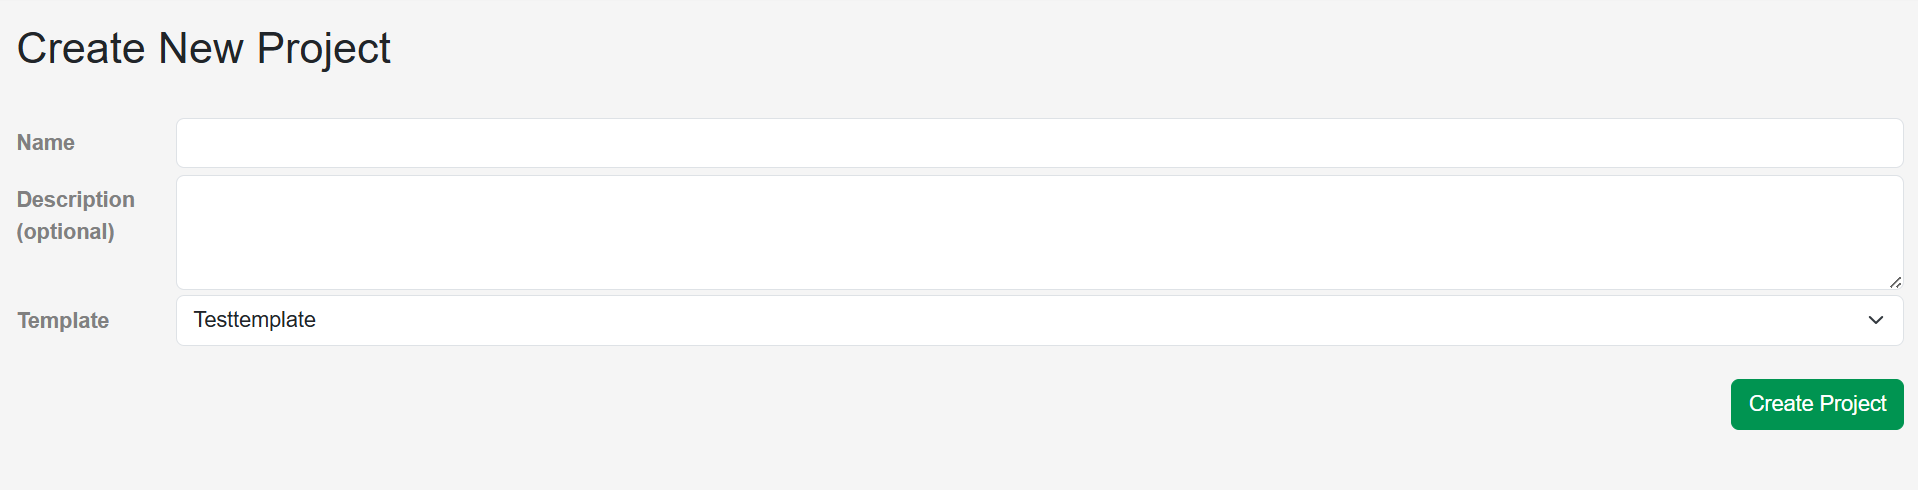 The description is optional.
You can already choose the template you want to use for this project. However, you can easily change the template later in the project metadata.
2. Project Metadata
Before you start importing your content, you should make sure to fill out the project metadata. This not only prevents it from being forgotten, but without basic metadata, the export does - for technical reasons - not work.
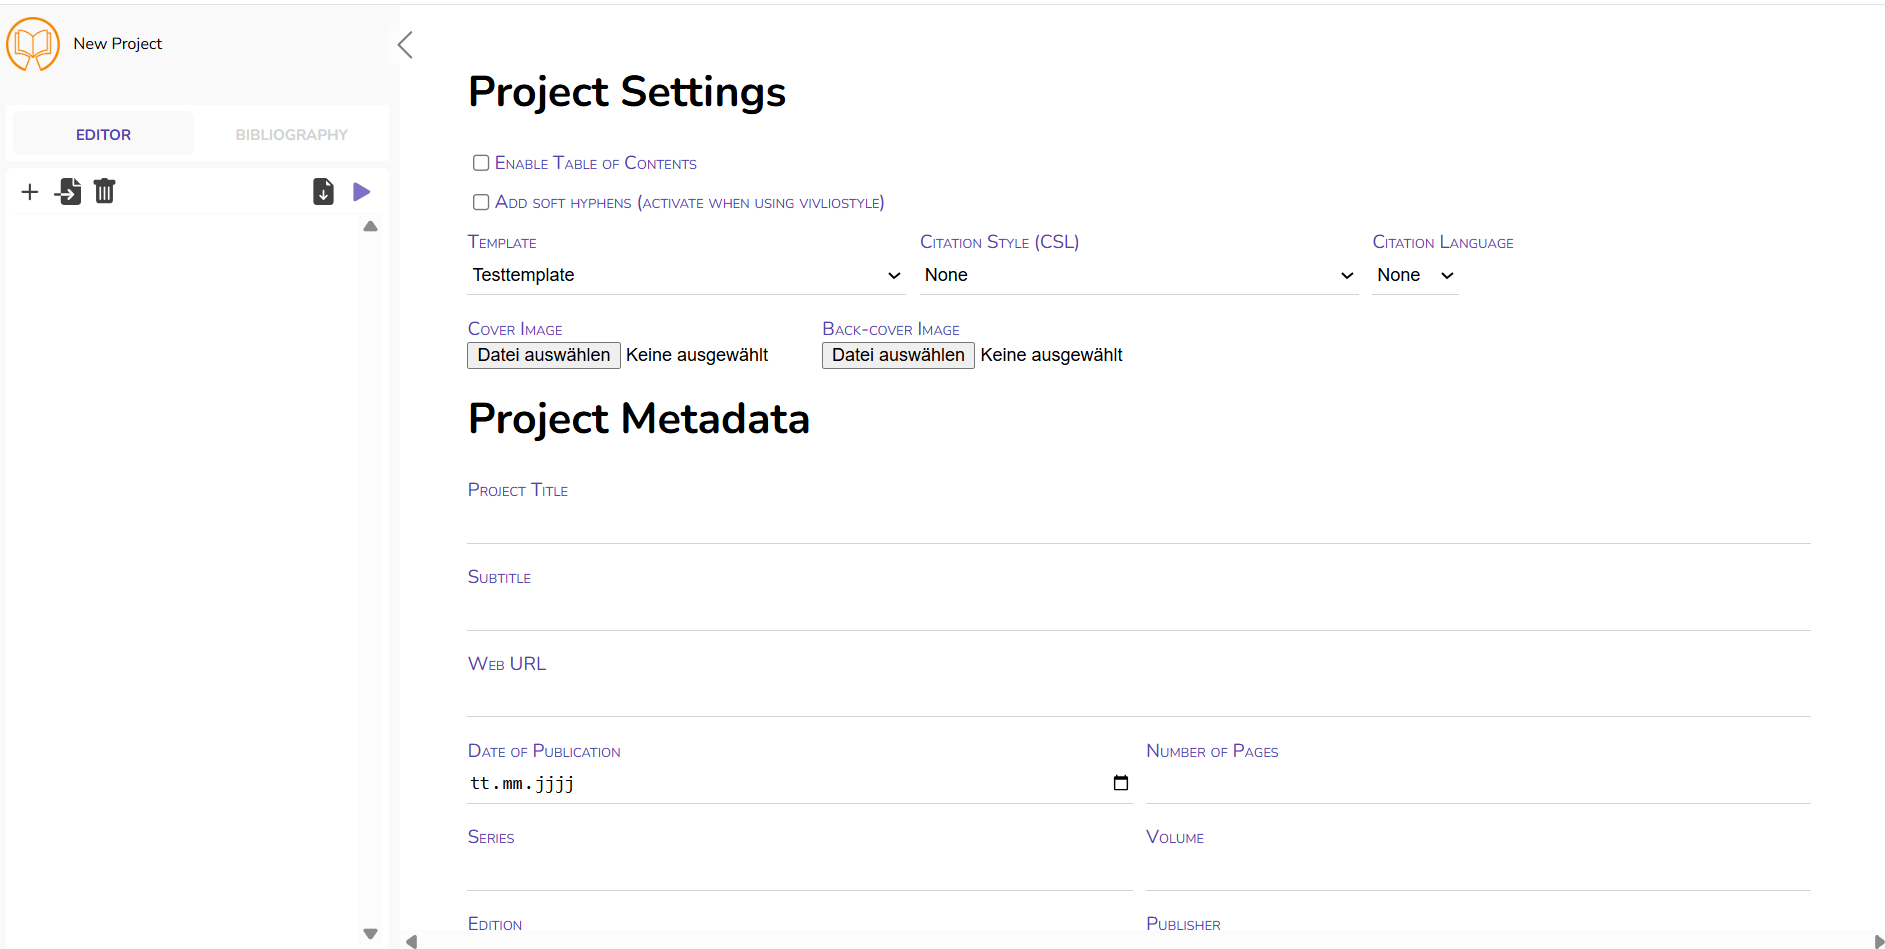 Simply fill in the information, where applicable.
Enable Table of Contents: Activate this option, if you want to include a table of contents in your publication. It also has to be specified in the template you are using, that the Table of Contents will only be generated if this option is activated.
Add soft hyphens: If you work with Vivliostyle, please activate this option. Otherwise you can ignore this. The standard template provided by us does not rely on Vivliostyle.
Template: Choose between different templates. For more information on templates, please refer to the section "Template Documentation"
Citation Style: Choose from a variety of existing citation styles. As an administrator, you can also upload new citation styles.
Citation Language: Some citation styles offer different language versions, e.g. translating "Author 1 and Author 2" into other languages.
Cover Image: Here you can upload your front- and backcover. Images must not exceed 1 MB.
Colors may appear slightly different, as Publish Goods works with CMYK.
Title & Subtitle: Enter the title and subtitle of the planned publication
Date of Publication: Enter the (planned) date of publication. Like all other settings, the date can be changed at any time.
Number of Pages: This may seem counterintuitive, but Publish Goods cannot automatically determine the number of pages in the exported file. Therefore, shortly before exporting the final version, enter the total number of pages (based on a near-final version). At the beginning, you can leave this field empty.
Web URL: If the content you are working with is already published in another format, you can add the URL here. Otherwise, leave this field empty.
 Series: If your publication is part of a series, add the name of the series here.
Volume: Enter if applicable.
Edition: Enter if applicable.
Publisher: Specify the organisation acting as the publisher.
Short Abstract: The short abstract should not exceed 255 characters.
Long Abstract: The long abstract should not exceed 4,000 characters.
See "3. Persons" for how to create author profiles.
Keywords: Enter a number of keywords that describe your publication. You can choose from existing keywords in the GND database or add your own.
Language: Select the language of your publication. For hyphenation purposes, Publish Goods also recognizes the language automatically.
Licence: Select from the drop-down menu under which Creative Commons (CC) license the project is published. You can learn more about CC-licenses here.
Identifiers: If your publication has persistent identifiers, add them here. Select the identifier type from the drop-down menu, enter the name (e.g. DOI, ISBN, or adjust the name if applicable, e.g. ebook ISBN) and copy-paste the identifier into the "Value" field.

In the template settings, you can define that the persistent identifiers listed in the project metadata are automatically included in the imprint
After you click "Add", you can no longer change the information. Hence, if there is an error in the persistent identifier, delete the information (on the right, red trash can symbol) and add a new one.
DDC Classification: Select from the drop-down menu which discipline your publication belongs to. Once selected, an additional drop-down menu will appear automatically to select a subfield, and subsequently a sub-subfield. For a book on constitutional law, this might look like this: Social Sciences → Law → Constitutional & Administrative Law.

3. Entering Authors & Editors
Typically, your publication has authors and/or editors. You have two options to assign authors/editors to a project.
a) Entering names directly
 The fastest way is to simply enter the name directly in the text field. This can be done in the project metadata (for the entire project) or for each section (e.g. for edited volumes, journals articles, etc.)
After you press "Enter", the name will appear as an element below "Authors".
You can adjust the order of authors using drag-and-drop. 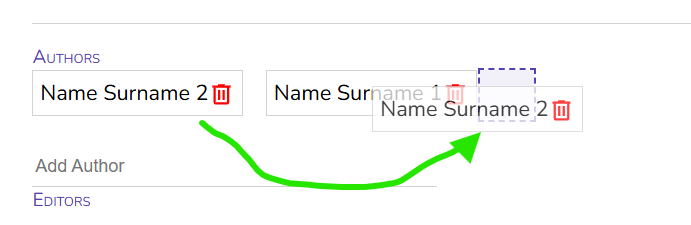
You cannot change an author's name once it is has been entered. However, you can delete the entry by clicking on the bin icon and add a corrected version.
b) Creating Person Profiles
Entering a person's name directly in the project/section metadata is the fastest way, but also has some shortcomings: There is the risk of typos, of incoherences (e.g. John J. Doe vs. John Doe, etc.) and typos and your have to re-enter names repeatedly. By creating person profiles, you build up a database that can be used throughout all your projects and provides additional functionalities, such as displaying a authors bio or ORCID. Wether and how these information are displayed depends on the template you are using.
 To create a person profile, go to the project overview page and click on "Persons" in the top menu bar.
Add new persons profiles by clicking on the "+"-symbol.
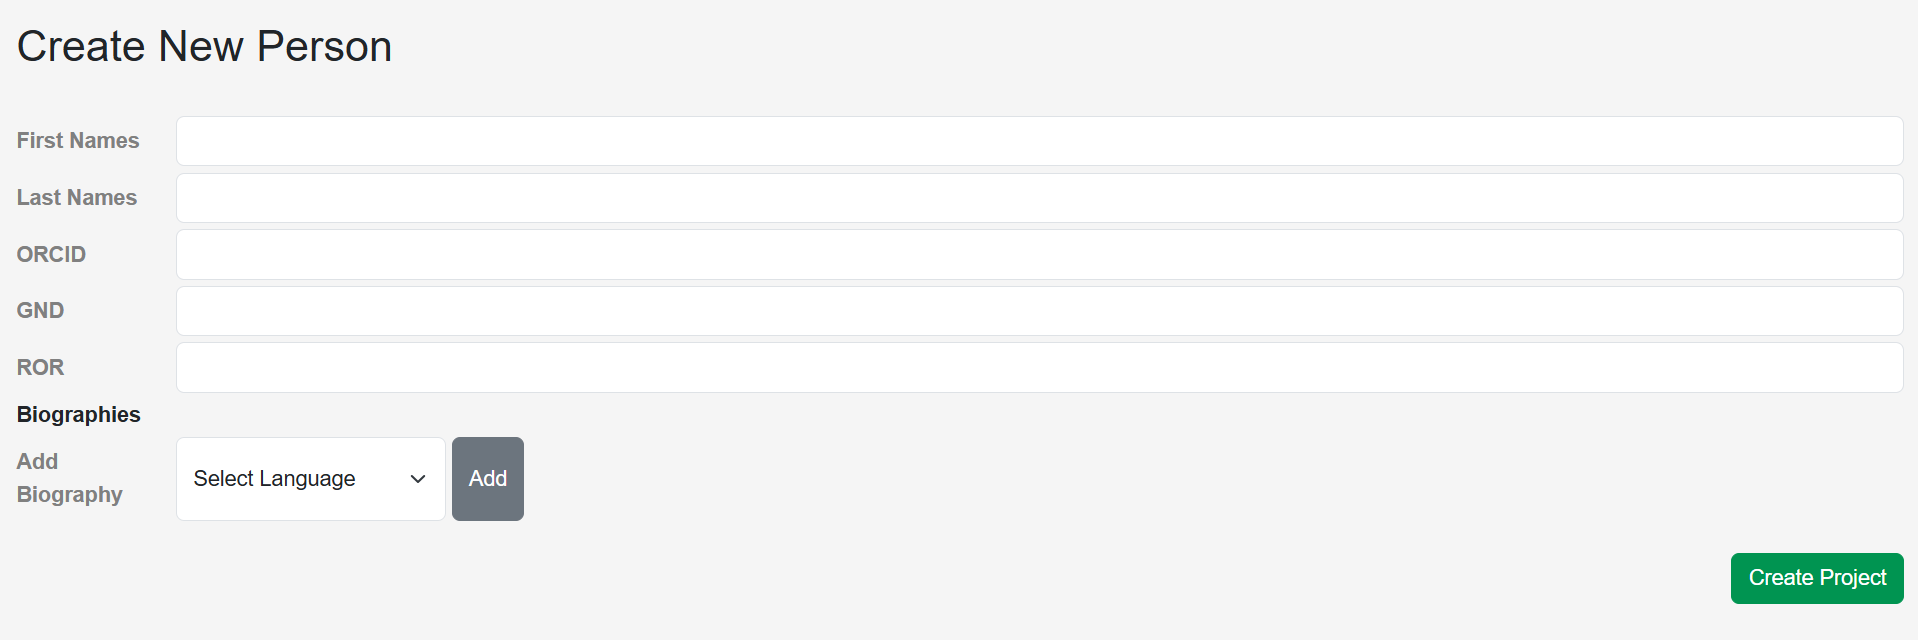
You can now enter the first name, last name, as well as identifiers such as ORCID, GND, and ROR.
Only the last name is a required field.
After entering all information, click on "Create Project".
Currently, the author's biography cannot be added during profile creation. Click first on "Create Project" and follow the steps described below.
After the person profile has been created, you will be automatically redirected to the "Persons" overview page, where all existing profiles are listed. To edit a profile or add a biography, click on the profile. A small menu will appear on the right.
S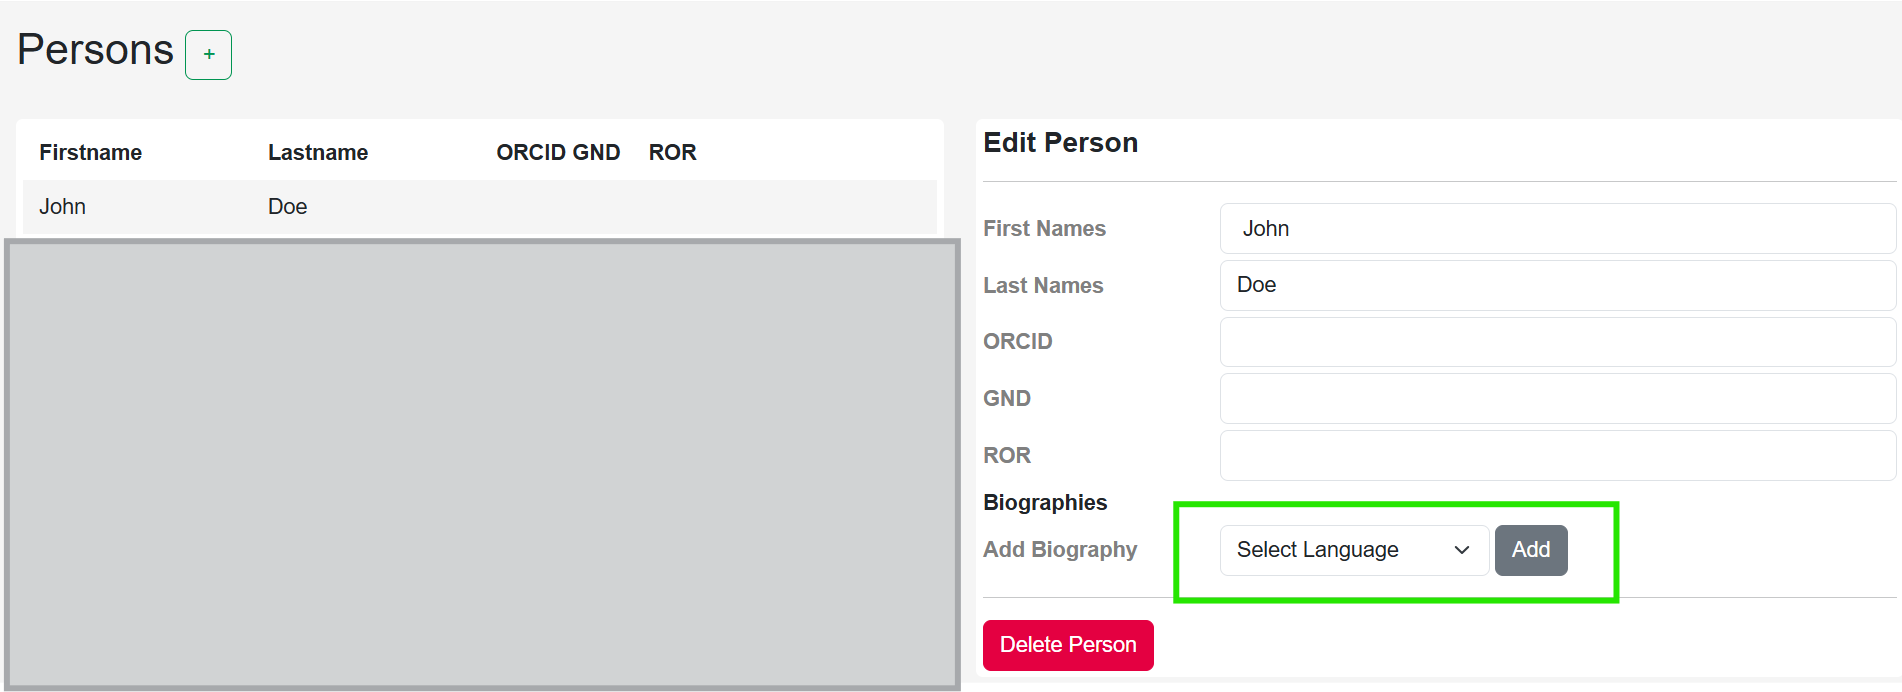 elect the language of the bio in the drop-down-menu and click on "Add". A text field will then appear where you can enter the author's bio.
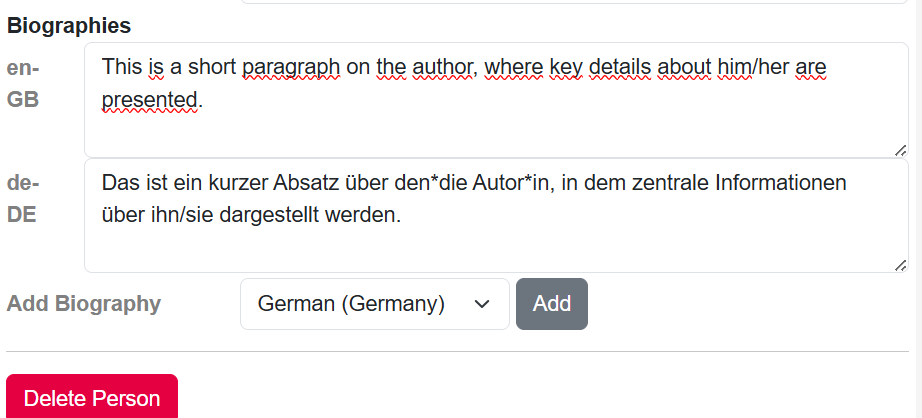 You can also add multiple language versions of the authors bio. Which language is displayed in your publication (e.g. in the list of authors) depends on the project language (which can be changed in the metadata, see above) and, more importantly, your template settings.
All changes are saved automatically.
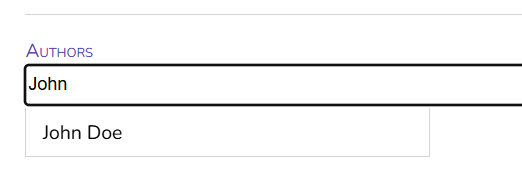 When you return to your project and open the project metadata or section metadata (click on the section and open the metadata by clicking on the downward-pointing arrow at the top), you can search your person database by name or last name.
Simply select the desired author to assign them to the project or section.
Currently, you can only search authors via the name or surname. Hence, searching for "John" shows all results, and searching for "Doe" does, but searching for "John Doe" won't find the author profile. This will be fixed in the future.
A. Import
You can import content either from WordPress or an uploaded file.
To start the import wizard open any project and click the "Import" button on the top left corner.

You can now choose between different import options in the dialog window:

1. Import from Wordpress
You can import posts either via a list of links or by filtering posts from a specified WordPress host.
a) Import by Links
Choose "WordPress" → "Import by Links" in the import wizard and paste the links to all articles you wish to import into the input area. Add one link per line. This might look as follows:

Currently, only direct links to posts can be processed. Links to categories will not work, for imports based on WordPress categories, use the filter option described below.
Import Settings
After inserting your links, you can adjust the import settings. The options are largely self-explanatory, for a brief overview, see the section below.

Click "Start Import" to import the content into your Publish Goods project.
b) Import all posts matching a filter
 Choose "WordPress" → "Filter Posts" in the import wizard.
Now fill in the WordPress host you wish to import from, e.g. "verfassungsblog.de". Do not include the protocol (https://)!
Loading all categories from the WordPress host may take some time, especially if there are many.
You can now define which posts should be imported. There are three filter options:
i) Include Posts in Categories
If enabled, only posts which are included in at least one of the selected categories will be imported. Note that posts that are in a subcategory are not automatically added to the parent category. But you may use the recursive selection button before the checkbox of every parent category to auto-check all subcategories.
ii) Exclude Posts in Categories
If enabled, excludes all posts which are included in at least one of the selected categories. All other posts will be imported.
iii) Filter by Publish Date
If enabled, only posts within the specified time range will be imported. You can specify a start date, an end date, or both.
On the lower left corner of the import wizard, you will see the number of posts matching your filters. It may display "N/A" if you many categories are selected. This however only affects the preview number, the import will work correctly.
Example:

With these settings, all posts published in January 2026 and added to one of the sub-categories of "AAA General" (but not "AAA General" itself!) will be imported.
"After 01.01.2026" includes posts of the 01.01.2026 (and onwards), "before 01.02.2026" excludes posts of the 01.02.2026 (i.e. includes posts of 31.01.2026)
After clicking "Next", you can configure the import settings.
Settings for WordPress Imports
After selecting the filters or entering the links to import, you will can set these import settings:
If enabled, author names are extracted from WordPress and added to the sections. Only names are imported. If you require additional information (e.g. authors bio, ORCID, ROR, etc.), you have to create person profiles manually via the “Persons” menu (see Section "Getting Started: Project Creation, Metadata & Persons").
Convert Footnotes to Endnotes:
If enabled, all imported footnotes are converted into endnotes.
Shift Headings up by one level:
If enabled, all heading levels are shifted up by one level. H2 → H1, H3 → H2 etc. This may be useful if imported posts start with H2 instead of H1.
Convert Links to Citations:
Attempts to convert links in the text into citations using a Zotero Translation Server. If a link cannot be converted, it remains unchanged. This works best with static web pages and generally does not work with links to PDF documents.
2. Import from Documents

You can also import content from documents, such as Word-Documents, LaTeX, OpenOffice, etc.
Via "Select Files/Dateien auswählen", choose the document you want to import. Each document becomes a section in Publish Goods. If you are preparing e.g. an edited volume or a journal issue, it is recommended to upload each chapter/article as separate files.
Currently, only one file per upload can be processed. To import multiple files, you will need to repeat the process.
As with WordPress imports, you can configure settings for footnotes/endnotes, heading structure, and link-to-citation conversion.
If you want to use Publish Goods as citation management system, you can also upload BibTeX files under "Optional Bibliography". For more on this see the section "Citation Management".
3. Organisation

After importing your sections, you can reorder them using drag-and-drop.
You can also structure your content using sections and subsections.

Using subchapters requires using a respective css template.
B. Editing & Organisation
Publish Goods offers various ways to edit and structure your contents.
1. Metadata
Before you get started, you should ensure that the metadata of each section is complete and correct. If you imported the content via Links, many of the metadata (such as title, author, date, URL, persistent identifier) are automatically filled in.

Fill in the title and subtitle of the section.
Under "ToC Overwrite" you have the possibility to display the title differently in the automatically generated Table of Contents. The Table of Contents would display the current Title and Subtitle (as default, this can be adjusted in the css-Template) as "Test Chapter Title: Subtitle". In case of special titles (e.g. ending with a question mark or with an ellipsis, you might want to display it without the automatic colon between title and subtitle in the Table of Contents. In most cases, you can simply ignore this field.
After this, you fill in the Authors Name. You can do so by simply writing the Name and press "Enter". You can of course also add more than one author. You can change the order of authors by drag-and-drop. Typically, a single section has no editor, so this field can be ignored.
If applicable, you can add the URL of the text, as well as persistent identifier, such as DOIs or ISBNs. Also the publish date can be added. Depending on the settings in your template, these information can be displayed in the exported document e.g. showing the URL or DOI on the title page of each chapter.
The language is identified automatically, however you can also specify it manually. The selected language determines the automatic hyphenation.
2. Editing
With Publish Goods, you have several ways to edit and format your texts.
First, you can simply directly edit your texts by writing and adding texts, creating new paragraphs, etc. or deleting existing text. All changes are automatically saved. Just like in Word, you can reverse your last action by the key combination "Ctrl+Z".

More advanced options open up if you mark a certain words or sentences. Automacially, a small menu opens up:
"B": changes the text to bold
(you can also use the key combination "Ctrl+B")
"i": changes the text to italics
(you can also use the key combination "Ctrl+I")
̶"S̶": changes the text to strikethrough
If you want the text underlined, simply use the keyboard combination "Ctrl+U". Also other basic commands, such as copy (Ctrl+C), paste (Ctrl+V), cut (Ctrl+X) work in Publish Goods.
Adding Links
You can also easily add links to your Text. Simply mark the passage that should link to a website and choose "Link".
Let's say in the sentence "If you would like to receive the weekly editorial as an e-mail, you can subscribe here.", we want to add a link to  the word "here". Simply mark the word and choose "Link" in the menu. A small window will open, where you can add the link destination (i.e. the URL users will be directed to).
Optionally, you can add specifications such as "external", "noopener" or "noreferrer" in the field "Rel." @KEANU/MIKA: Könnt ihr kurz erläutern was das macht?
Lastly, you can specify whether the link should open in a new tab or the same tab in the drop-down menu ("Target").
Finally, you press "Save" and the word "here" refers to the indicated page. In Publish Goods, links are displayed in blue and underlined, how the link is formatted in the exported format can be adjusted in the Templates.
All other functions you can see in the menu are explained in other Sections:
- "T": Structuring
- Footnotes/Endnotes & Cite: Citation Management
- CSS: Fine-Tuning
3. Structuring
Publish Goods allows you to structure your text with different headings, subheadings etc. You can also add images, quote blocks, lists or add more complex elements through html. You can also easily change the order of the different paragraphs.
 If you move your cursor over a paragraph, on the left (or right, depending on your browser) two buttons appear: a plus-symbol ("+") as well as six dots. If you click on dot-menu, the following menu appears. In the lower part you can delete the entire paragraph, or move it before the preceeding paragraph or behind the following paragraph.
You can also delete the selected paragraph.
Under "Convert to" you will find a drop-down menu with several options.

a) Heading
Turns the Paragraph into a (sub-)heading. This might be helpful if you want to add a new subheading or existing subheadings in your imported text are not categorized as headings (but normal paragraphs).
Like in most word processing tools, you can structure your text through different levels of headings.

After you have transformed a paragraph into a heading, you determine the level of the respective heading. Different Headings will be depicted in the Editor with different font sizes and in bold. This however only serves the purpose of keeping them apart and identifying the structure while editing, and does not reflect how the subheading is displayed in your exported documents. This depends on the settings in the css Template.
b) List
Turns the paragraph into a list. You can add new points to the list by simply pressing enter at the end of the list.

If you set your cursor at the end of the first bullet point and press enter, you can add more element to your list.
 You have further possibilities to format the list if you click once again on the dot menu left (or right, depending on your browser) of the list.
You can switch between bullet points (unordered) and a numbered list (ordered, 1., 2., etc.)
You may also resolve the list back into a normal paragraph through "Convert to". Just like before, you can also move the list or delete it.
How the list is ultimately depicted in your pdf (or other preferred document) can be adjusted in the css-Template. Through the menu you can only determine the basic characteristics (e.g. unordered or ordered, number of bullet points, etc.)
c) Quote
If you want to include longer passages of citations, you might want to separate it from the rest of the text. You can do so by choosing "Quote". The paragraph is then automatically transformed into a quote. You can also simply copy and paste text into the quote field.
 Again, you can make basic formatting adjustments by clicking on the dot menu. Further options, e.g. making blockquotes automatically in italics, a different font or with a background colour can be made in the css Template.
Under the quote, there is an additional text field (see yellow arrow). There you can add the source, author, context, etc. to the quote. This allows you to opt for a different formatting for the quote and the source (e.g. italics & non-italic) in the css-Template.
d) Images

To add images in your publication, you can simply click on the plus-symbol and choose "Image".
You will then see that a placeholder is inserted ("Select an Image"). If you click on it, you can upload an image out of your files. The image must not exceed 1MB.

By default, the images a scaled to 100% of the width (i.e. where the text starts on the left and ends on the right). This can be adjusted in the template.

You can make basic adjustments to the image by clicking on the dot-menu points next to the image. All three options are yes/no settings.
Whether and how the settings (border, stretch, background) are displayed can be changed in the template.
You can also add additional information in the caption field below, e.g. the source, CC-license, an image description, etc.
e) Tables & more

The option "Raw HTML" offers the possibility to include more complex contents in your publication, e.g. Tables, Code, etc.
Simply add your HTML code in the textfield and define its characteristics.
If you want to include a table, your html code might look like this:
 <table>
  <thead>
   <tr> <th>Column A</th> <th>Column B</th> </tr>
  </thead>
  <tbody>
    <tr><td>Row 1</td><td>Value A</td></tr>
    <tr><td>Row 2</td><td>Value B</td></tr>
    <tr><td>Row 3</td><td>Value C</td></tr>
    <tr><td>Row 4</td><td>Value D</td></tr>
  </tbody>
</table>
If you are unfamiliar with html, there are many templates online, also AI tools can be very helpful.
4. Fine-Tuning
Through css, you can go beyond the basic formatting options described above and customize your publications.

A css-class that is already defined in our default-template [@MIKA, IST DAS TATSÄCHLICH DRIN?] is "nobreak". Let's say, in your exported pdf is a hyphenation that is either wrong (e.g. in case of a foreign term or an abbreviation) or simply unwanted (e.g. to many hyphenations after each other), you can simply mark the word, choose "CSS" in the pop-up menu and then write "nobreak" into textfield.
In the example you can see in the screenshot, we want to prevent a hyphenation of "Verfassungsblog", as it is a proper name and therefore not part of database on which the automatic hyphenation is based on. After adding "nobreak" and pressing "save", you will see that the word is underlined with a dotted line.
You can further customize your publication with other, additional css classes. These have to be first defined in the template. You could e.g. define a css class for a different font, different font size, a certain colour, etc.

If you want to apply a css class to an entire paragraph instead of a single word, simply click on the dot-menu and write the css class into the indicated field. This is saved automatically.
For more information on css classes and the templates, please refer to the section "Template"
C. Citation Management
Publish Goods has an integrated citation management system. It works similarly to programs such as Citavi and Zotero: For each source, you create a bibliographic entry (bib entry) file with all relevant information, e.g. title, author, year of publication, etc. After linking this entry to a specific word or sentence in your text, the corresponding footnote or endnote is generated automatically, based on the citation style selected for the entire project. This reduces errors, ensures consistency, and saves significant time, especially in larger projects.
However, you can also add references manually in footnotes or endnotes if preferred.

You can set and change the citation style in the project metadata.
1. Overview
 In the panel on the left, you can see two options "Editor" and "Bibliography". The functionalities of the Editor have been described in the section "B. Editing and Organisation", here, you can view all sections and reorder them as needed.
If you switch to “Bibliography,” you will see an overview of all bib entries, i.e. the files to each reference.
2. Adding bib entries
Before adding a citation to your text, you must first create a bib entry.

To create a bib entry, simply click on the "+"-symbol at the top left corner.
A form with various input fields will appear.

Most fields are self-explanatory. In many cases, you will not need to fill in every field. For example, "Archive" is rarely required, and "Language" is not always specified in citations. In addition, some fields may not be applicable (e.g. monographs do not have volume or issue numbers). Simply fill in those information, that you consider necessary, respectively those information, that are required by your chosen citation style.
In many cases, articles, blog posts, etc. are published in something (e.g. a Journal, Newspaper, Blog, etc.). For this, you have to a) create a bib entry for the article (with a Title, Author, year, etc.), but also b) the medium (e.g. German Law Journal, Verfassungsblog, etc.).
A) B)


You can then assign per drag-and-drop the article to the respective Journal, Blog, etc. This makes organising your citations much easier and avoids incoherences through diverging name usage (e.g. Verfassungsblog vs. VerfBlog vs. Verfassungsblog. On Matters Constitutional).
[BILD EINFÜGEN; WENN BUG GEFIXT]
3. Adding a bib entry through BibTex files
Instead of entering all information manually, you can import BibTeX or RIS files.
Academic publications typically have persistent identifiers such as a DOI or ISBN. You can copy such an identifier into a service like https://zbib.org/ which retrieves the associated metadata. You can then export this data as a BibTeX or RIS file.
In Publish Goods, click on "Import" and use the import option on the right-hand side (Word, LaTeX, Pandoc).
 -->
-->

Under "Optional Bibliography" select your BibTex file and click on "Upload". The references are now automatically imported into the bibliography of your project.

It is recommended to review imported entries, as metadata can sometimes be incomplete or inaccurate.
4. Adding a reference
Once you have created or imported your bib entries into Publish Goods, you can add references to your text.

Simply mark the spot, where the reference should appear (E.g. at the end of a sentence.x) It does not matter, whether you mark only the colon or the entire last word. Then, you click on "Cite" in the appearing menu.
 You can then select the desired bib entry by entering the title or the name of the author/editor in the last text field. Simply type in the title or the name of authors/editors.
You could also add a prefix or a suffix. This allows for flexibility to add a comment, specify a page, etc.
 In case you want to edit the citation, add a pre- or suffix, or delete it altogether, simply click on the "C" icon. From here, you can also directly edit the bib entry.
Editing the bib entry means you are editing all references to this entry. Not only the one reference you clicked on.
4. Adding Foot- and Endnotes
You can also add footnotes and endnotes manually, either for comments or for references entered without the citation system.
Mark the spot where the footnote or endnote should appear.

You can now write your Foot-/Endnote in the text field. Specify in the drop-down menu above whether the text should appear as footnote or as endnote.

You can use html tags in the footnote, e.g. to write in <i>italics</i> or <b>bold</b>. If you want to avoid a hyphenation a word, you cannot use a css class. Instead, you must manually control line breaks, for example by inserting a linebreak <br>.
D. Export
The final and most important step is exporting your project. This means transforming the content from the editor into a fully formatted and layouted publication.
This step is typically not only the last stage in preparing your publication, but also a step in between to ensure that all your settings in the template work as intended. Also, exporting the publication in its intended format is essential for checking layout, formatting, and hyphenation.
 If you wanto to quickly check, whether a recent change has led to major shifts in the layout, the hyphenation in the following lines, etc. or you want to briefly check, whether e.g. a css-class formatting is working as intended, "Render Preview" (on the right, purple arrow) is the ideal option.
Simply click on "Render Preview". A green banner ("Started preview rendering.") will appear and after a couple of seconds a panel next to the editor text opens up, where you can scroll through the rendered document. You can also adjust the zoom or modify the panel layout.
The time until the preview appears depends on the length of your project.
If you want to export your project as a PDF or in other formats, click on the "Download" icon (on the left, yellow arrow).
 The available export formats depend on the output formats you have previously set up for your template. You can create different file formats as outputs (e.g. PDF, epub, xml), but also diverging versions, e.g. a PDF with and without bleed, for print and the digital version.
You can also choose to not export the entire project but only selected chapters. To do so, select "Only Selected Chapters" and another menu opens up, where you can select those sections that should be exported.
Note: If you export only selected chapters, they will nevertheless have page numbers starting from p. 1. Hence, if you export your second chapter (that would normally start with p. 20), it will now begin with p. 1.
 Once the export process is complete, you can see the following panel:
Simply click on "Download Files" - the download of a zip-file then starts automatically. You will find the zip-file in your downloads. Open it to access your finished publication created with Publish Goods!
Template Documentation
This part of the documentation contains all fields that can be used in templates and a quick guide how to create templates.
Introduction
We are using HTML & CSS to typeset and layout publications. HTML (Hypertext Markup Language) is a markup language and the base of every website. HTML contains your contents in a structured, machine readable form. CSS (Cascading Style Sheets) adds styling to HTML documents, so they no longer just a wall of text.
HTML
A basic HTML document would look like this:
This is not a useful template and just an example how basic HTML works
<!DOCTYPE html>
<html>
<body>

<h1>My First Heading</h1>
<p>My first paragraph.</p>

</body>
</html>
Templates
Our templates are not pure HTML, they are written with handlebars. The templates contain HTML but also adds placeholders where your content blocks (e. g. a headline and a paragraph) will be added later. The template is used to generate the finished HTML file.
So this template:
<!DOCTYPE html>
<html>
<body>

{{#each children}}
{{html}}
{{/each}}

</body>
</html>
with two content blocks inside, children could generate the HTML above.
CSS
When we created a template, we can add CSS to style our publications. There are multiple ways to add CSS:
Inline CSS
This should only be used if you only want to style one specific element.
<!DOCTYPE html>
<html>
<body>

<h1 style="color: red;">My First Heading</h1>
<p>My first paragraph.</p>

</body>
</html>
This will result in a red headline.
Stylesheets
This is the preferred way to style your publications since it defines universal styling rules that will be automatically applied.
Firstly, we have to add a head block with a link to our css file (here book.css):
<!DOCTYPE html>
<html>
<head>
  <link rel="stylesheet" href="book.css">
</head>
<body>

<h1>My First Heading</h1>
<p>My first paragraph.</p>

</body>
</html>
Now we will need to create this css file:
h1{
color: red;
}
Now all level 1 headings (h1) will be rendered red.
More Resources
This article can only give you a first impression of what HTML/CSS is. You can find a detailed guide to create templates in the next articles, but you should learn the HTML/CSS basics first.
Here is a list of good resources for learning the basics:
Template Syntax
Templates are mostly used to create an HTML version of your content, which then can be used to create further formats (e.g., PDF, EPUB). Our templates are based on Handlebars, a simple template engine.
Print a value
To display a value (see available fields) you can use two curly brackets:
<h1>Book Title: {{metadata.title}}</h1>
You will need to use three curly brackets, if your fields contain HTML:
<h1>Book Title with HTML: {{{metadata.title}}}</h1>
Conditions
You may want to hide/show fields depending on if they are empty/unset or not.
If-Condition
Use the if condition to only do something, if the value is not null/empty:
{{#if metadata.subtitle}}
<h2>{{metadata.subtitle}}</h2>
{{/if}}
This code snippet will only create a heading if metadata.subtitle is not null/empty.
Why should I bother using if's?
You could just use {{metadata.subtitle}} and if it's empty it will not show. But it will typically still affect spacing/etc. if you create the HTML element (e.g., an empty <h2></h2>)
You can also add an else branch, which will be executed if the specified field is null/empty:
{{#if metadata.title}}
<h1>{{metadata.title}}</h1>
{{else}}
<h1>Lorem Ipsum</h1>
{{/if}}
This code snippet will print “Lorem Ipsum” if metadata.title is null/empty.
Unless-Condition
If you want to show something, unless a variable is set & not empty, you can use unless:
{{#unless metadata.title}}
<h1>Warning: Title missing!</h1>
{{/unless}}
Iterate through multiple Entries
Often you will need to iterate through a list of things, e.g. authors or sections. You can use each for that:
<h1>Contributing Authors:</h1>

{{#each metadata.authors}}
<p>{{first_names}} {{last_names}}</p>
{{/each}}
This snippet will show first and last names of every author in the project.
Context Change
Note that the context changes with the use of each: You may expect we would use {{metadata.authors.first_names}}, but we have to strip away metadata.authors since we "entered" the context when we used each.
Partials
You may want to split your template into several, reusable parts. Just create another template file (e.g. metadata_page.hbs.html) and include it via {{> metadata_page}} or {{> global_assets/metadata_page}} if you created the template as a global asset.
Fields to be used in templates
This section contains a list of all fields you can currently use in templates.
Notation: List<Person> = a list of values with the type Person,
Project Metadata
Prefix: metadata.
(e.g. metadata.title prints the book title)
| Field |
Type (string/number/list/type/bool) |
Optional (true/false) |
Description |
| title |
string |
false |
Project title |
| subtitle |
string |
true |
Project subtitle |
| authors |
List<PersonOrString> |
false (but may be empty) |
List of all authors, either added to the project or to one of the (sub)sections |
| editors |
List<PersonOrString> |
false (but may be empty) |
List of all editors, either added to the project or to one of the (sub)sections |
| web_url |
string |
true |
URL to a web version of this project (e.g. blog symposium) |
| identifiers |
List<Identifier> |
true |
List of identifiers, e.g. ISBNs, DOIs, etc. |
| published | DetailedDate | true |
publish date |
| languages |
List<Language> |
true |
project language(s) |
| number_of_pages |
number |
true |
currently not used |
| short_abstract |
string |
true |
short abstract / content summary |
| long_abstract |
string |
true |
long abstract / content summary |
| keywords |
List<Keyword> |
true |
List of keywords with optional gnd identifier |
| ddc |
string |
true | DDC class |
| license |
License |
true |
License of the publication - either Creative Commons or a custom license.
Variants:
|
| series |
string |
true |
Series this publication belongs to |
| volume |
string |
true |
Volume this publication belongs to |
| edition |
string |
true |
Edition of this publication |
| publisher |
string |
true |
Publisher of this publication |
PersonOrString
One of these variants:
- Person -> type Person
- NameString -> type String
Person
| Field |
Type (string/number/list/type/bool) |
Optional (true/false) |
Description |
| id |
string |
true |
internal unique id |
| first_names |
string |
true |
one or more first names |
| last_names |
string |
false |
one or more last names |
| orcid |
Identifier |
true |
ORCID (Open Researcher and Contributor ID) |
| gnd |
Identifier |
true |
GND (Gemeinsame Normdatei) |
| bios |
List<Biography> |
true |
list of biographies for this person, with specified language |
| ror |
Identifier | true |
ROR (Research Organization Registry ID) |
Identifier
| Field |
Type (string/number/list/type/bool) |
Optional (true/false) |
Description |
| id |
string |
true |
internal unique id |
| name |
string |
false |
custom name of the identifier (e.g. "ebook ISBN) |
| value |
string |
false |
value of the identifier (e.g. the ISBN) |
| identifier_type |
IdentifierType |
false |
Identifier Type - one of these variants:
|
Language
One of these variants:
- DE
- EN
Biography
| Field |
Type (string/number/list/type/bool) |
Optional (true/false) |
Description |
| content |
string |
false |
the biography |
| lang |
Language |
true |
language of the biography |
Keyword
| Field |
Type (string/number/list/type/bool) |
Optional (true/false) |
Description |
| title |
string |
false | the keyword |
| gnd |
Identifier |
true |
GND belonging to this keyword |
DetailedDate
| Field |
Type (string/number/list/type/bool) |
Optional (true/false) |
Description |
| year | number | false | the year |
| month | number | true | month as number without leading zero |
| month_leading_zero | string | true | month as string with leading zero |
| month_name | MonthName | true |
Matches one of these variants:
|
| day | number | true |
day as number without leading zero |
| day_leading_zero | string | true |
day as string with leading zero |
| day_weekday | Weekday | true |
Matches one of these variants:
|
Project Settings
Prefix: settings.
(e.g. settings.cover_image_path)
Note: settings is an optional field
| Field |
Type (string/number/list/type/bool) |
Optional (true/false) |
Description |
| toc_enabled |
bool |
false |
Whetether a table of contents should be shown |
| csl_style |
string |
true | name of the enabled csl (citation style language) |
| csl_language_code |
string |
true |
used language code for csl |
| metadata_page_additional_html |
string |
true |
Information to be shown on the metadata/imprint page |
| cover_image_path |
string |
true |
filename of the cover image. You can include the image with <img src="uploads/{{settings.cover_image_path}}"> |
| backcover_image_path |
string |
true |
filename of the backcover image. You can include the image with <img src="uploads/{{settings.backcover_image_path}}"> |
Project Contents
sections is a List of Sections.
Example to print all section titles:
{{#each sections}}
<h1>{{metadata.title}}</h1>
{{/each}}
Section
| Field |
Type (string/number/list/type/bool) |
Optional (true/false) |
Description |
| id | string | false | unique section id |
| sub_sections | List<Section> | false (but can be empty) | a (nested) list of sections |
| children | List<ContentBlock> | false (but can be empty) | content blocks of this section |
| metadata | SectionMetadata | false | Metadata of this section |
| visible_in_toc | bool | false | whetether this section should be shown in the toc |
| endnotes | List<Endnote> | false (but can be empty) | list of endnotes used in this section |
ContentBlock
| Field |
Type (string/number/list/type/bool) |
Optional (true/false) |
Description |
| id | string | false | unique content block id |
| block_type | BlockType | false |
BlockType variants:
|
| html | string | false |
content of this block as html |
SectionMetadata
| Field |
Type (string/number/list/type/bool) |
Optional (true/false) |
Description |
| title | string | false | title of this section |
| toc_title_subtitle_override | string | true | optional version of the title + subtitle for the table of contents |
| subtitle | string | true | subtitle of this section |
| authors | List<PersonOrString> | false (but can be empty) | authors of this section |
| editors | List<PersonOrString> | false (but can be empty) | editors of this section |
| web_url | string | true | url to web version of this section (e.g. blog post) |
| identifiers | List<Identifier> | false (but can be empty) | identifiers of this section (e.g. chapter doi) |
| published | DetailedDate | true | date the section was published |
| lang | Language | false | language of this section |
Endnote
| Field |
Type (string/number/list/type/bool) |
Optional (true/false) |
Description |
| num | number | false | number of the endnote in this section |
| id | string | false | unique id of the endnote |
| content | string | false | formatted endnote as html |
Special Helpers (QR-Codes)
Currently, we provide a special handlebars helper that can be used in templates:
QR-Code Helper
Syntax: {{qrcode <content> <dark_color> <light_color>}}
With this helper, you can create QR-Codes (as svg) with the specified content (e.g. a URL). Optionally, you can provide a dark and/or a light colour (as hex string) to be used in the QR-Code.
Examples:
{{qrcode "https://verfassungsblog.de"}} - Creates a simple QR-Code leading to verfassungsblog.de with black colour on white background
{{qrcode "https://verfassungsblog.de" "#FB5074"}} - Creates a QR-Code with pink colour on white background
Admin Documentation
This part of the documentation shows how to install & maintain the Verfassungsbooks Server & Rendering Server(s).
Set up CA for mTLS
We are using mTLS to secure the connection between the main server and the rendering servers. You will have to set up your own Certificate Authority (CA) and create a certificate for each server. All servers with a certificate from the same CA will be able to communicate with each other. Do not use a certificate from an CA you don't own!
Preparations
1. Install openssl
apt install openssl on ubuntu/debian based systems
pacman -Syu openssl on archlinux based systems
2. Create a new directory for your CA and cd into it:
mkdir my-ca && cd my-ca
3. Create CA config
Create a new file ca.conf with this content:
[ca]
default_ca = default

[default]
dir = .
certs = $dir
new_certs_dir = $dir/db.certs

database = $dir/db.index
serial = $dir/db.serial

certificate = $dir/root.crt
private_key = $dir/root.key

default_days = 365
default_crl_days = 30

default_md = sha256

preserve = no
policy = default_policy

[default_policy]
countryName = optional
stateOrProvinceName = optional
localityName = optional
organizationName = supplied
organizationalUnitName = supplied
commonName = supplied
emailAddress = optional

[crl_ext]
authorityKeyIdentifier=keyid:always

[ usr_cert ]
basicConstraints = CA:FALSE
keyUsage = digitalSignature, keyEncipherment
extendedKeyUsage = clientAuth, serverAuth
authorityKeyIdentifier = keyid,issuer
subjectKeyIdentifier = hash
subjectAltName = $ENV::SAN
4. Initialize CA directories and files
mkdir -p db.certs input output
touch db.index
echo "01" > db.serial
5. Generate CA private key & cert
openssl ecparam -name prime256v1 -genkey -noout -out root.key
openssl req -new -x509 -key root.key -out root.crt -days 3650 -sha256
Important: keep all private keys secure, especially the CA private key!
If leaked, anyone can connect to your main / rendering server.
6. Generate certificate revocation list & convert to correct format
export SAN="DNS:<hostname>"
openssl ca -config ca.conf -gencrl -out crl.pem
openssl crl -in crl.pem -out crl.der -outform DER
Create & Sign certificates
You successfully set up your own CA, now you can create and sign certificates for each of your servers.
On each server: Generate the private key & certificate signing request:
openssl ecparam -name prime256v1 -genkey -noout -out client.key
openssl req -new -key client.key -out client.csr -sha256
Make sure to use a different common name for each certificate! Also make sure to supply an organizationalUnitName.
Transfer the .csr file to the system with your CA certificate.
On the CA host:
Set the SAN & sign with your CA. Replace <hostname> with your server's hostname! Adjust the file names if needed.
export SAN="DNS:<hostname>"
openssl ca -config ca.conf -in client.csr -out client.crt -days 3650 -extensions usr_cert
Transfer the created certificate (e.g. client.crt) back to the server.
Installation
Main Server
You can either build the application from source or use a prebuilt binary (only linux x64).
Build from Source
At least version 1.85 of cargo is required. Try using rustup instead of your distributions packages if you're running into issues.
- You will need to have rustc, openssl, pkg-config, cargo and npm installed & in your path
- Clone the repository:
git clone https://github.com/Verfassungsblog/PublishGoods . - Install typescript requirements:
npm install -g handlebars typescript@5.9.3 webpack webpack-cli - cd into typescript & run:
cd typescript && npm install - Build with cargo:
cd ../ && cargo build --release - Run with
cargo runor withtarget/release/PublishGoods
Use a prebuilt binary
- Download the latest release from GitHub
- extract the archive:
tar -xf verfassungsbooks-bundled.tar.gz - Run with
./PublishGoods(or create a systemd service)
Adjust Configuration
You can adjust the binding address & port in the Rocket.toml.
You will always need to generate a secret_key. Furthermore, you may use this one-liner:
sed -i "s|secret_key *= *\"\"|secret_key= \"$(openssl rand -base64 32)\"|" Rocket.tomlAll other configuration options are located in the config folder.
Add mtls certificates
Example Systemd Service File
To register the server as a systemd service with autostart and running in the background you may use this service file (save as /etc/systemd/system/publishgoods-server.service)
[Unit]
Description=Publishgoods Server
After=network.target

[Service]
WorkingDirectory=/home/verfassungsbooks/verfassungsbooks-server
# or ExecStart=/home/verfassungsbooks/verfassungsbooks-server/target/release/Verfassungsbooks when building from source
ExecStart=/home/verfassungsbooks/verfassungsbooks-server/Verfassungsbooks
Restart=always
User=verfassungsbooks

[Install]
WantedBy=multi-user.target
You will need to create a user verfassungsbooks (or change the username in the service file) and change the WorkingDirectory to the directory your installation files lye in. Then adjust the ExecStart so it points to the executable (Verfassungsbooks or target/release/Verfassungsbooks).
Make sure that the user running the server has write permissions in the data directory!
Now you can start the server with systemctl start publishgoods-server. Logs are redirected to your journal (use journalctl -xe).
Rendering Server
Requirements
For weasyprint you will need to install these requirements:
Ubuntu:
apt install python3-pip libpango-1.0-0 libharfbuzz0b libpangoft2-1.0-0 libharfbuzz-subset0
Docker-Compose Setup (recommended)
The easiest way to spin up a Publish Goods instance and a rendering server is our docker-compose setup.
WIP
Developer Documentation
Learn how to set up your development environment.
Repositories & CI/CD pipeline
This application consists of one main server and one or many rendering servers. For shared types, there is an exchange library.
Repositories
Verfassungsbooks/Verfassungsbooks
Verfassungsbooks/Verfassungsbooks-Rendering-Server
Verfassungsbooks/Verfassungsbooks-Exchange-Lib
CI/CD Pipeline
Currently, we are using GitHub actions to automatically build and test on new commits or pull requests. Pushs to the Verfassungsbooks master branch are also automatically deployed to the staging test environment, pushs to the Verfassungsbooks-Rendering-Server master branch are automatically deployed to the staging test rendering server (editor-staging-rendering1.verfassungsblog.de)
GitHub Action Workflows
The repositories have three GitHub workflows configured:
- build-master.yml -> Builds and tests commits to the master branch, automatically deploys them to the staging system
- build-test-all.yml -> Builds ant tests commits / pull requests to any branch (except master)
- push-to-prod.yml -> manually triggered; builds and tests a specific commit, deploys to productive system (editor.verfassungsblog.de / editor-rendering1.verfassungsblog.de)
Writing new API Endpoints
Security
Important: All non-public routes must use type Session in the routes parameters! Otherwise, no login is required to access it!
Minimal boilerplate:
#[get("/api/non/public/endpoint")]
pub async fn my_endpoint(
    _session: Session,
) -> Json<ApiResult<()>> {
  ApiResult::new_data(());
}
Endpoints
Typically, you should implement GET, POST, DELETE and PATCH routes. POST routes are only used to create new objects, PATCH routes are used to update an existing object.
GET Route Example
Route to get a specific section in a project
/// GET /api/projects/<project_id>/sections/<content_path>?<expand>
///
/// Parameters:
/// * project_id (string) - the projects uuid
/// * content_path (string) - path to a specific section, split by ':'
/// * expand (string, optional) - optionally expand one of these fields: authors, editors, subsections
///
/// By default strips out subsections & only returns id's for authors and editors.
/// Use the optional expand query parameter to expand these fields
/// E.g. ?expand=authors,editors,subsections will show the full data
///
#[get("/api/projects/<project_id>/sections/<content_path>?<expand>")]
pub async fn get_section(
    project_id: &str,
    content_path: &str,
    expand: Option<&str>,
    _session: Session,
    settings: &State<Settings>,
    project_storage: &State<Arc<ProjectStorage>>,
    data_storage: &State<Arc<DataStorage>>
) -> Json<ApiResult<APISectionResult>> {
    ...
}
Test your routes
You may test your new endpoints with curl. First, obtain a session cookie via your browser. Then use curl:
In Depth: Editor CRDT
Work in Progress! CRDT isn't implemented yet.
Ablauf:
- Client möchte Kapitel bearbeiten, Client öffnet web socket mit Server
- Client bekommt yDoc von Server
- Client wandelt yDoc Änderungen in EditorJS Blockänderungen um <-- Herausforderung 1
- Bei Änderungen an Blöcken wird änderung in yDoc Änderung umgewandelt <-- Herausforderung 2
- yDoc Änderung wird an Server geschickt
- Server schickt yDoc Änderung an alle anderen Clients
Beispiel EditorJS Block JSON:
{
"id": "jaJh1uNPLq",
"type": "paragraph",
"data": {
"text": "In the spring of 2024, video cameras from numerous global news outlets turned their attention to a court in Strasbourg. People traveled from across Europe, gathering with signs in front of the courthouse. Minors from Portugal stood alongside senior citizens from Switzerland to witness one of the most significant moments in the recent history of the European Convention on Human Rights. For the first time, the European Court of Human Rights (ECtHR) ruled on the impact of the climate crisis on human rights and what this means for the Convention’s signatory states. The court’s Grand Chamber issued rulings on three cases: the case of <i>Carême v. France</i><citation data-key=\"ECtHR_careme_2024\">C</citation> (“<i>Carême</i>”), brought by the former mayor of Grande-Synthe, France; the case of <i>Duarte Agostinho and Others v. Portugal and 32 Others</i><citation data-key=\"ECtHR_duarte_2024\">C</citation> (“<i>Duarte Agostinho</i>”), brought by six youth applicants from Portugal; and the case of <i>Verein KlimaSeniorinnen Schweiz and Others v. Switzerland</i><citation data-key=\"noauthor_hudoc_nodate\">C</citation><i> </i>(“<i>KlimaSeniorinnen</i>”). While the first two cases were deemed inadmissible, the court handed down a ruling in <i>Klimaseniorinnen</i>, which is already regarded as one of the most important judgments in climate change litigation. The court stated that “the state has a positive duty to adopt, and effectively implement in practice, regulations and measures capable of mitigating the existing and potentially irreversible future effects of climate change”. Regarding the Swiss government, one of the Convention’s signatory states, the court concluded that by failing to put in place a sufficient domestic regulatory framework for climate change mitigation, the government violated Article 8 of the European Convention on Human Rights (ECHR), the right to respect for private and family life. Article 8 requires “that each Contracting State undertake measures for the substantial and progressive reduction of their respective GHG emission levels, with a view to reaching net neutrality within, in principle, the next three decades” (<i>KlimaSeniorinnen</i>, para. 548). Moreover, the Court found a violation of the right of access to court (Article 6 of the ECHR). "
},
"tunes": {}
},
{
"id": "M29CgX78Fc",
"type": "header",
"data": {
"text": "The three climate rulings",
"level": 1
},
"tunes": {}
},EditorJS hat eine insert Funktion, über die können wir Blöcke dann einfügen: https://editorjs.io/blocks/#insert
Wir müssen ein äquivalent in yrs Typen schaffen, tunes brauchen wir nicht, id's vermutlich auch nicht (?). Data muss eine map sein und hat neben text optionale andere einträge
Protokoll
Clients und Server kommunizieren über Websockets miteinander. Das erste Byte jeder Nachricht bestimmt den Nachrichtentyp:
| 1st Byte Decimal Value | Name | Binary / JSON? | Sent from | Data | Description |
| 10 | CONNECT | JSON | Client | document_id | Connect to server with existing session and edit document with document_id |
| 11 | WELCOME | JSON | Server | client_id | todo |
| 20 | GETDOC | Binary | Client | StateVector | todo |
| 30 | DOCUPDATE | Binary | Client / Server | Document update | todo |
| 40 | SETCURSOR | JSON | Client/Server | client_id, block_id, start, end (optional, only for selections) | todo |
| 41 | REMOVECURSOR | JSON | Server | client_id | todo |
| 50 | DISCONNECT | JSON | Client | client_id | todo |
| 60 | ERROR | JSON | Server | status_code, error_msg | error occured, e.g. authorization failed due to invalid session_id, document not found etc. |
Auth: The client has to send a valid session cookie when establishing the websocket.
Useful CSS Rules
Here, we're trying to list the most useful css rules for (print/pdf/ebook) publications.
Page Setup
Originally, CSS was designed for websites, not paged media. Therefore, we have to tell CSS that we want pages.
@pageDOC
The @page at-rule is a CSS at-rule used to modify different aspects of printed pages. It targets and modifies the page's dimensions, orientation, and margins.
@page {
    size: A4; /* This is the page size */
    margin: 2cm; /* margin between page border and content. */
}sizeDOC
Total page size, Example values: A4, 10cm 10cm, …
marginDOC
Margin between border and your content.
You can set different margins on each site: margin: 1cm 2cm 3cm 4cm; will set the following margins: top 1cm, right 2cm, bottom 3 cm, left 4cm.
margin-top / margin-left / margin-right / margin-bottom
Same as margin but explicitly for one side. Use either margin: OR margin-top etc.
@page:left / @page:right / @page:first / @page:blank
You may additionally define one or multiple of these rules. @page:left only applies to left pages, etc.
@top-left-corner/@top-left/@top-center/@top-right/@top-right-corner/@bottom-left-corner/@bottom-left/@bottom-center/@bottom-right/@bottom-right-corner/@left-top/@left-middle/@left-bottom/@right-top/@right-middle/@right-bottom
With these rules you can add content inside the margins, e.g. page numbers or a headline. Have to be used inside a page or page:left (etc.) rule!
@page {
    @bottom-center {
        content: "Test Footer";
    }

    @top-center {
        content: "Headline!";
    }
}
Typesetting
text-alignDOC (Text Alignment)
Sets the text alignment. Typical values:
The inline contents are aligned to the left edge of the line box.
The inline contents are aligned to the right edge of the line box.
The inline contents are centered within the line box.
The inline contents are justified. Spaces out the content to line up its left and right edges to the left and right edges of the line box, except for the last line.