
B. Editing & Organisation
Publish Goods offers various ways to edit and structure your contents.
1. Metadata
Before you get started, you should ensure that the metadata of each section is complete and correct. If you imported the content via Links, many of the metadata (such as title, author, date, URL, persistent identifier) are automatically filled in.
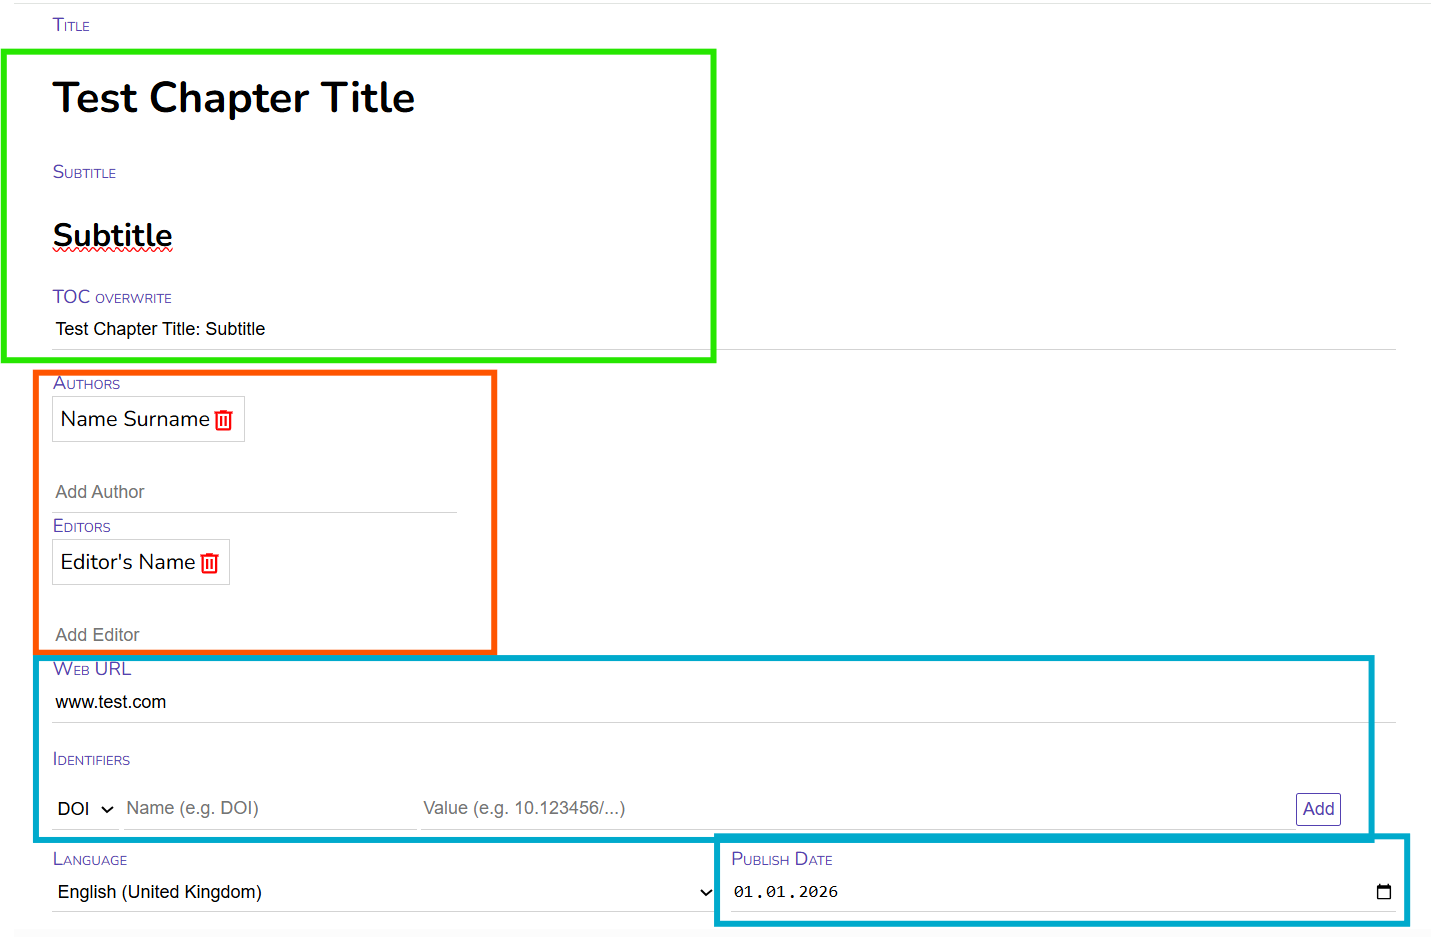
Fill in the title and subtitle of the section.
Under "ToC Overwrite" you have the possibility to display the title differently in the automatically generated Table of Contents. The Table of Contents would display the current Title and Subtitle (as default, this can be adjusted in the css-Template) as "Test Chapter Title: Subtitle". In case of special titles (e.g. ending with a question mark or with an ellipsis, you might want to display it without the automatic colon between title and subtitle in the Table of Contents. In most cases, you can simply ignore this field.
After this, you fill in the Authors Name. You can do so by simply writing the Name and press "Enter". You can of course also add more than one author. You can change the order of authors by drag-and-drop. Typically, a single section has no editor, so this field can be ignored.
If applicable, you can add the URL of the text, as well as persistent identifier, such as DOIs or ISBNs. Also the publish date can be added. Depending on the settings in your template, these information can be displayed in the exported document e.g. showing the URL or DOI on the title page of each chapter.
The language is identified automatically, however you can also specify it manually. The selected language determines the automatic hyphenation.
2. Editing
With Publish Goods, you have several ways to edit and format your texts.
First, you can simply directly edit your texts by writing and adding texts, creating new paragraphs, etc. or deleting existing text. All changes are automatically saved. Just like in Word, you can reverse your last action by the key combination "Ctrl+Z".
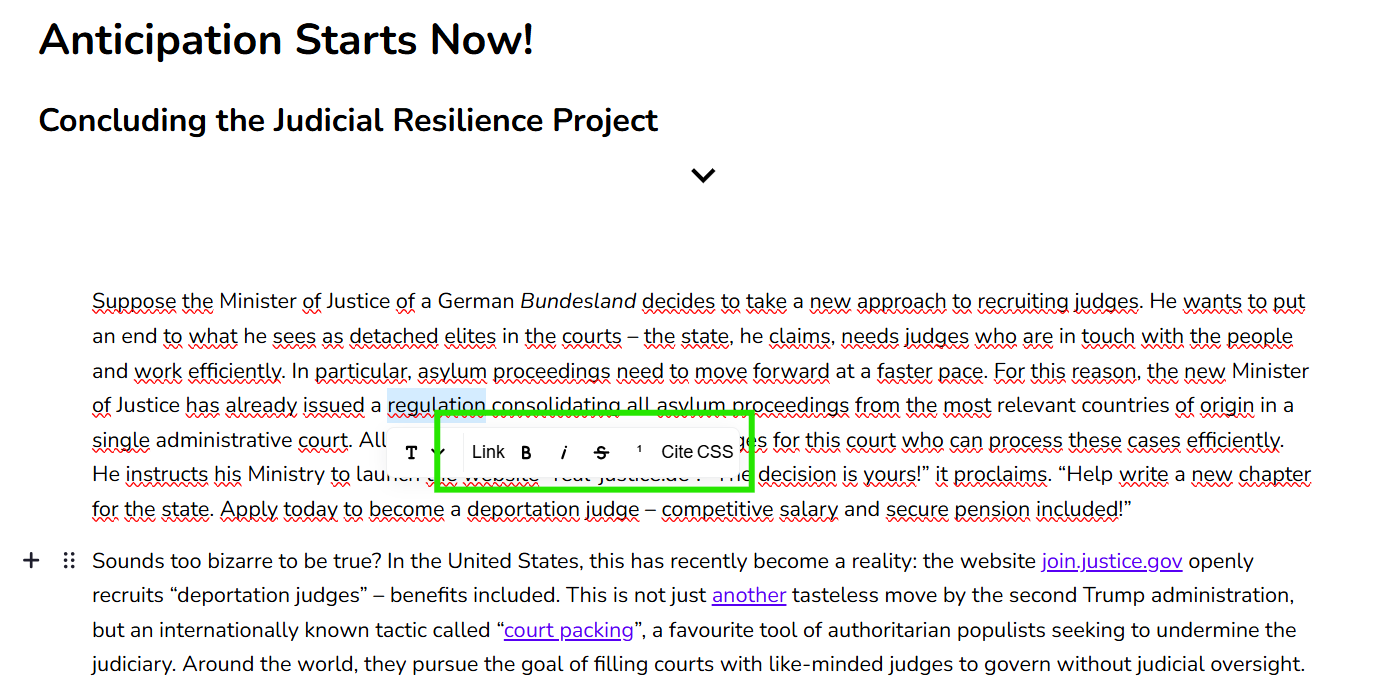
More advanced options open up if you mark a certain words or sentences. Automacially, a small menu opens up:
"B": changes the text to bold
(you can also use the key combination "Ctrl+B")
"i": changes the text to italics
(you can also use the key combination "Ctrl+I")
̶"S̶": changes the text to strikethrough
If you want the text underlined, simply use the keyboard combination "Ctrl+U". Also other basic commands, such as copy (Ctrl+C), paste (Ctrl+V), cut (Ctrl+X) work in Publish Goods.
Adding Links
You can also easily add links to your Text. Simply mark the passage that should link to a website and choose "Link".
Let's say in the sentence "If you would like to receive the weekly editorial as an e-mail, you can subscribe here.", we want to add a link to 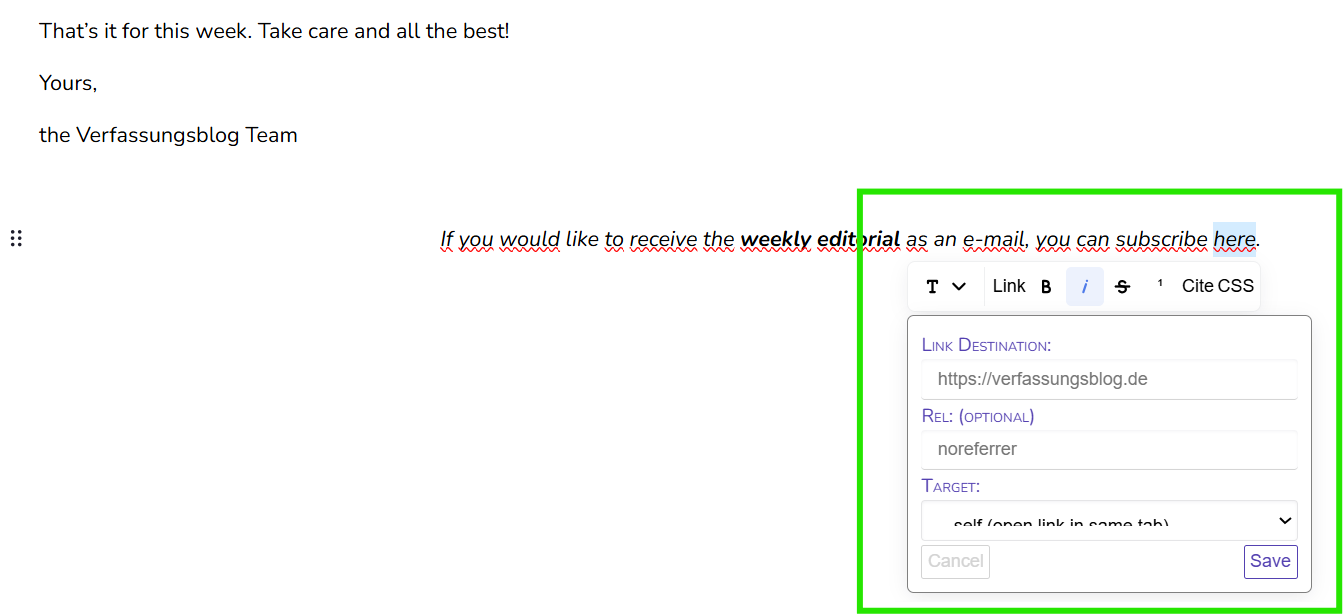 the word "here". Simply mark the word and choose "Link" in the menu. A small window will open, where you can add the link destination (i.e. the URL users will be directed to).
Optionally, you can add specifications such as "external", "noopener" or "noreferrer" in the field "Rel." @KEANU/MIKA: Könnt ihr kurz erläutern was das macht?
Lastly, you can specify whether the link should open in a new tab or the same tab in the drop-down menu ("Target").
Finally, you press "Save" and the word "here" refers to the indicated page. In Publish Goods, links are displayed in blue and underlined, how the link is formatted in the exported format can be adjusted in the Templates.
All other functions you can see in the menu are explained in other Sections:
- "T": Structuring
- Footnotes/Endnotes & Cite: Citation Management
- CSS: Fine-Tuning
3. Structuring
Publish Goods allows you to structure your text with different headings, subheadings etc. You can also add images, quote blocks, lists or add more complex elements through html. You can also easily change the order of the different paragraphs.
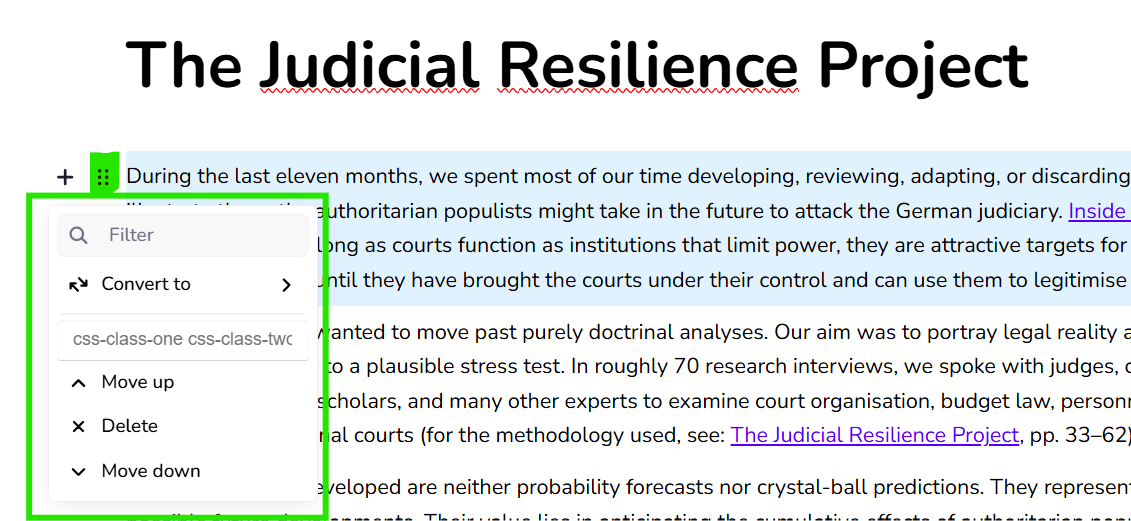 If you move your cursor over a paragraph, on the left (or right, depending on your browser) two buttons appear: a plus-symbol ("+") as well as six dots. If you click on the latter, the following menu appears. In the lower part you can delete the entire paragraph, or move it before the preceeding paragraph or behind the following paragraph.
You can also delete the selected paragraph.
Under "Convert to" you will find a drop-down menu with several options.
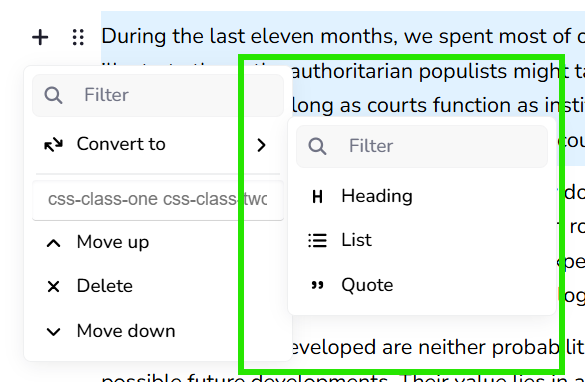
a) Heading
Turns the Paragraph into a (sub-)heading. This might be helpful if you want to add a new subheading or existing subheadings in your imported text are not categorized as headings (but normal paragraphs).
Like in most word processing tools, you can structure your text through different levels of headings.
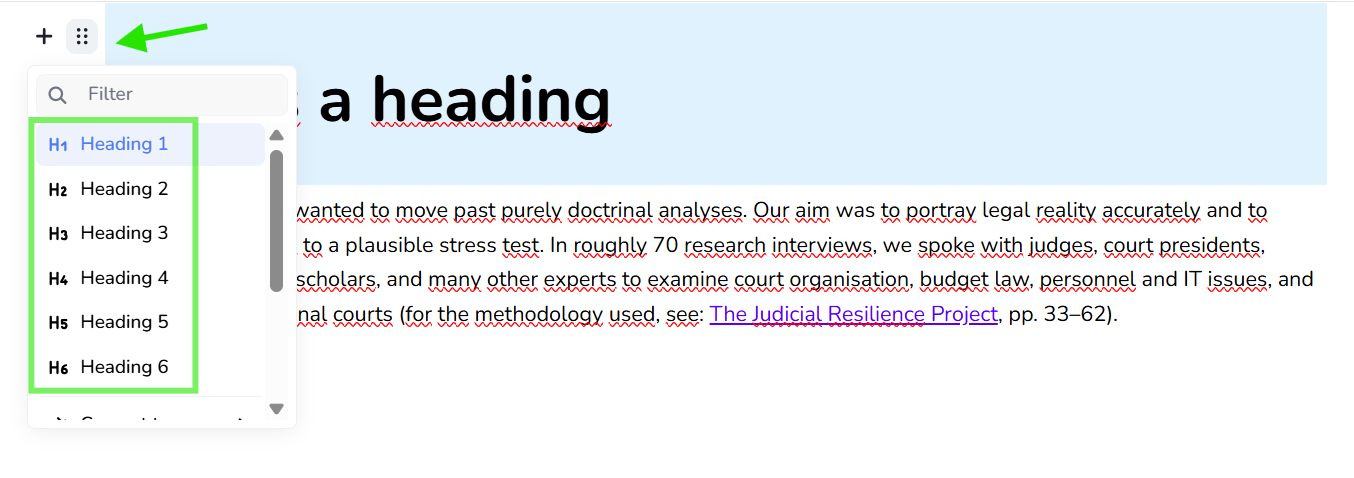
After you have transformed a paragraph into a heading, you determine the level of the respective heading. Different Headings will be depicted in the Editor with different font sizes and in bold. This however only serves the purpose of keeping them apart and identifying the structure while editing, and does not reflect how the subheading is displayed in your exported documents. This depends on the settings in the css Template.
b) List
Turns the paragraph into a list. You can add new points to the list by simply pressing enter at the end of the list.
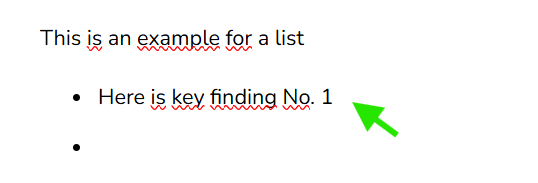
If you set your cursor at the end of the first bullet point and press enter, you can add more element to your list.
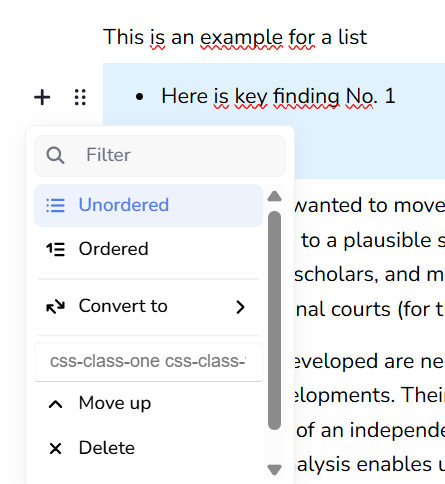 You have further possibilities to format the list if you click once again on the six dots left (or right, depending on your browser) of the list.
You can switch between bullet points (unordered) and a numbered list (ordered, 1., 2., etc.)
You may also resolve the list back into a normal paragraph through "Convert to". Just like before, you can also move the list or delete it.
How the list is ultimately depicted in your pdf (or other preferred document) can be adjusted in the css-Template. Through the menu you can only determine the basic characteristics (e.g. unordered or ordered, number of bullet points, etc.)
c) Quote
If you want to include longer passages of citations, you might want to separate it from the rest of the text. You can do so by choosing "Quote". The paragraph is then automatically transformed into a quote. You can also simply copy and paste text into the quote field.
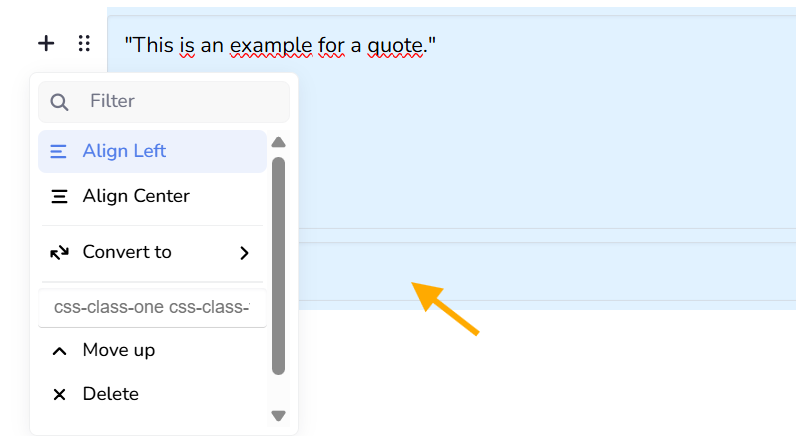 Again, you can make basic formatting adjustments by clicking on the six dots. Further options, e.g. making blockquotes automatically in italics, a different font or with a background colour can be made in the css Template.
Under the quote, there is an additional text field (see yellow arrow). There you can add the source, author, context, etc. to the quote. This allows you to opt for a different formatting for the quote and the source (e.g. italics & non-italic) in the css-Template.
d) Tables & more
4. Fine-Tuning
Through css, you can go beyond the basic formatting options described above and customize your publications.
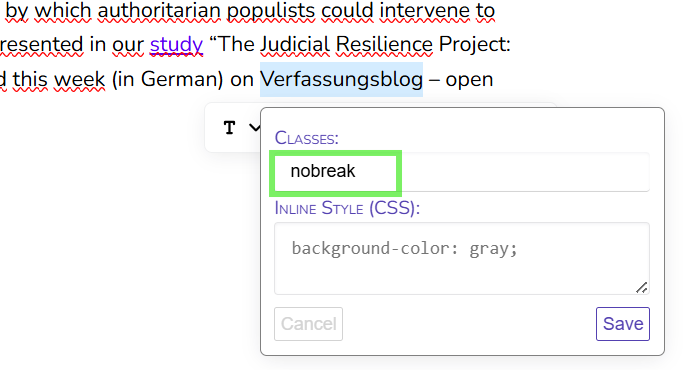
A css-class that is already defined in our default-template [@MIKA, IST DAS TATSÄCHLICH DRIN?] is "nobreak". Let's say, in your exported pdf is a hyphenation that is either wrong (e.g. in case of a foreign term or an abbreviation) or simply unwanted (e.g. to many hyphenations after each other), you can simply mark the word, choose "CSS" in the pop-up menu and then write "nobreak" into textfield.
In the example you can see in the screenshot, we want to prevent a hyphenation of "Verfassungsblog", as it is a proper name and therefore not part of database on which the automatic hyphenation is based on. After adding "nobreak" and pressing "save", you will see that the word is underlined with a dotted line.
You can further customize your publication with other, additional css classes. These have to be first defined in the template. You could e.g. define a css class for a different font, different font size, a certain colour, etc.
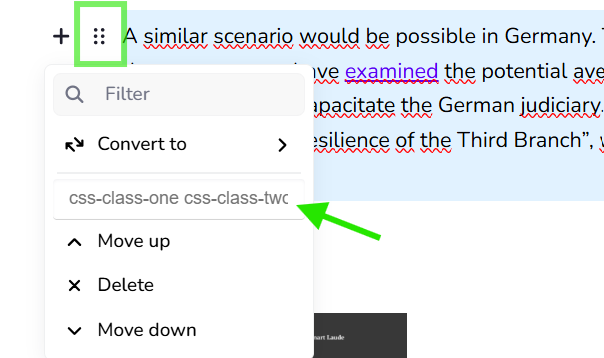
If you want to apply a css class to an entire paragraph instead of a single word, simply choose the six dots and write the css class into the indicated field. This is saved automatically.
For more information on css classes and the templates, please refer to the section "Templates"
Editing
Fine-Tuning